M01:
Introduction to Operating Systems
|
TU1:
Installing, configuring and exploiting a computer system
|
ASIX1
|
Practical
Exercise 8: Managing processes |
24-1-14
|
Practical Exercise 8: Managing processes
GENERAL CONDITIONS
1-
Deadline: 09-02-2014.
2- Send
your report as a PDF file
attached to an e-mail with the following specifications:
a) E-mail
address:
cf(at)collados.org or jordi.binefa(at)fje.edu
depending who is your teacher
b)
File Name:
b.1) ASIX1
(Catalan): asix1_surname_name_m01tu01pr8.pdf
b2.) DAW1 (English): daw1_surname_name_m01tu01pr8.pdf
c) Subject:
c.1) ASIX1 (Catalan): asix1_surname_name_m01tu01pr8
c.2) DAW1
(English): daw1_surname_name_m01tu01pr8
3- Make this report
individually.
4- Left, right, top and bottom
margins: 2cm.
5- Character format: a)
Font:Times New Roman (or Liberation Serif), b) Size: 10, c)
Questions typeface: Bold, d) Answers typeface: Regular
6- Page numbering on footer
bar
1- Basic Ideas
A program is only a set of code instructions
and data stored in a file and it can be seen as a passive
entity. A process is a program running, and
therefore, it can be seen as an entity in action, i.e, as a
changing and dynamic entity. When the code and data of a program
are sent to the RAM memory then the CPU can process the data
using the instructions of the code. At that moment, a new
process starts its execution.
During its lifetime, a process needs system resources such as
the CPUs in the system to run its instructions or the system's
physical memory or RAM to hold its data and code. Another kind
of resources can be files in a storage device (hard disk, USB
pendrive,....) or physical devices in the system such as a
sound card. The allocation of proper resources to each process
running in the system is a duty of Linux. Another duty of the
operating system is to avoid that a single process monopolizes
the most of the CPU time and RAM's space.
Linux is a multiprocessing operating system and
therefore, many processes are kept in memory at the same
time. Usually there are more process running that CPUs in the
system. Due to it, the processes have to share the
CPUs time, being the operating system who decides what process
is executed in each moment. The part of the operating system
responsible for allocating CPU time to each proccess is called
the scheduler
or scheduling
system. The scheduler is able to assign priorities to
process. The higher a process priority is, the higher
will be its CPU time.
In Linux, four classes of processes can be distinguished:
a) Interactive processes:
Interactive processes are started by
someone connected to the system. These processes interact with
their users, and therefore spend a lot of time waiting for
keypresses and mouse operations. When input is received, the
process must be woken up quickly, or the user will find the
system to be unresponsive. Typical interactive programs are
command shells, text editors, and graphical applications.
b) Daemons: These are server processes that run continuously. Most
of the time, they are initialized at system startup and
then wait in the background until their service is
required. A typical example is the Apache web server.
After the system is booted, the network daemon just sits
and waits until a client program, such as Firefox, needs
to connect.
c) Automatic (or Batch)
procesess:
These do not need user interaction, and they often run in
the background. Since such processes do not need to be very
responsive, they are often penalized by the scheduler. Typical
batch programs are programming language compilers, database
search engines, and scientific computations.
d) Real-time processes: These have very strong scheduling
requirements. Such processes should never be blocked by
lower-priority processes, they should have a short response time
and, most important, such response time should have a minimum
variance. Typical real-time programs are video and sound
applications, robot controllers, and programs that collect data
from physical sensors.
In Linux, if you work with the shell, you can run a process in
the:
a) Foreground: The process occuppies
the terminal that started the program, and you cannot start
other applications as long as this process is running.
b) Background: The process is running but
it does not occupy the terminal that started the program,
so that terminal can accept new commands while the program is
running. Running a process in the background is only useful
for programs that don't need user input. Putting a job in
the background is typically done when execution of a job is
expected to take a long time.
The bash shell allows an easy handling of processes running in
the foreground and the background thanks to a set of special
commands. These commands switches processes between the
foreground and the background.
In Linux, a process has a series of characteristics. The
following are the most important:
a)
The process ID or PID: A unique identification number used to
refer to the process. As long as the process exists, it keeps
the same PID number. Different processes of the same program
have different PIDs. When a process is ended, its PID is freed
and eventually the operating system can assign this number to
another process.
b) The
parent process ID or PPID: the number of the process (PID) that started
this process.
c) Nice number: It
is the degree of friendliness or niceness of this process
toward other processes. This number is closely related to
process priority. The higher the nice number is, the lower the
priority of the process is.
d) Real
User ID or RUID: The owner of the process,
i.e., the user issuing the command.
e) Effective User ID or
EUID: The one determining access and permissions to system resources.
RUID and EUDI are usually the same user.
Linux
processes have the following states:
a) Running: The process is either
running (it is the current process in the system) or it is ready
to run (it is waiting to be assigned CPU time).
b) Waiting:
The process is waiting for an event or for a resource. Linux
differentiates between two types of waiting process; interruptible
and uninterruptible. Interruptible waiting processes
can be interrupted by signals whereas uninterruptible waiting
processes are waiting directly on hardware conditions and cannot
be interrupted under any circumstances.
c) Stopped:
The process has been stopped. At the moment, no CPU time will be
assigned to the process.
d) Zombie:
An ended process, which has not freed its PID for some
unknown reason. In fact, the process no longer exists, and there
are no system resources allocated for this process, but its PID
can not be freed. Commands such as ps, which shows a list of processes, will
display the process even if it no longer exists. The most of the
times, a zombie process is due to a programming error.
In the present practical exercise we are going to work with a
set of commands and GUI programs which allow us to display and
manage the process running in our system. We will work with the
following commands: ps,
pstree, top, kill, killall, nice, renice, jobs, fg and bg. Additionally, we will
work with the GNOME System
Monitor, a useful GUI program.
2-Displaying running
processes
2.1- ps command
Display
information about the active processes. It is a complex
command with a wide range of options and parameters. Particularly
interesting are the following two modes of executing this command:
Inf
a) ps aux --> This command
displaying basic information (euid, pid, %memory, %cpu, stat,
command, ....) about every process running in the system.
b) ps -eo
pid,ppid,euid,euser,ruid,ruser,ni,%cpu,%mem,stat,start,time,args
--> This command displaying information about
the process ID, parent process ID, effective and real user (number
and name), % of CPU time and % of RAM allocated to the process,
nice number, state of the process, what time the command was
started, cumulative CPU time and command name (with arguments).
This command displays information about every process running in
the system.
The next example shows what happens when the ps aux command is
executed:
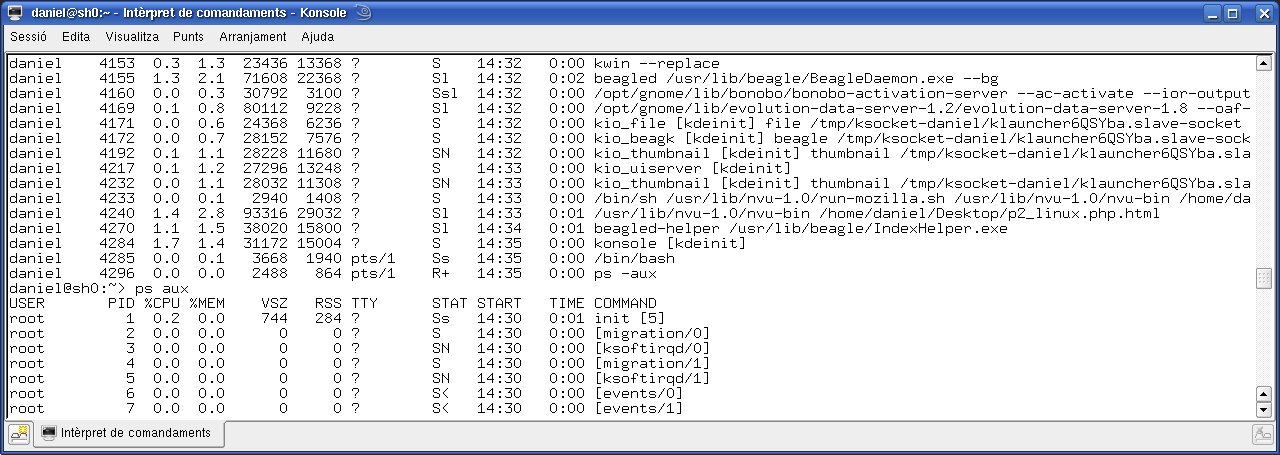
The most
important columns are:
USER: Effective user's name
PID: Process ID.
%CPU: % of CPU time
%MEM: % RAM memory
STAT: State
(R = Running S=Sleeping T=Stopped, Z=Zombie)
COMMAND: Command
(with arguments) executed.
2.2- pstree command
Display a tree
of processes. Using this command, the parent-child relationships
of processes is shown on the screen. The next example
shows what happens when the pstree command is executed:
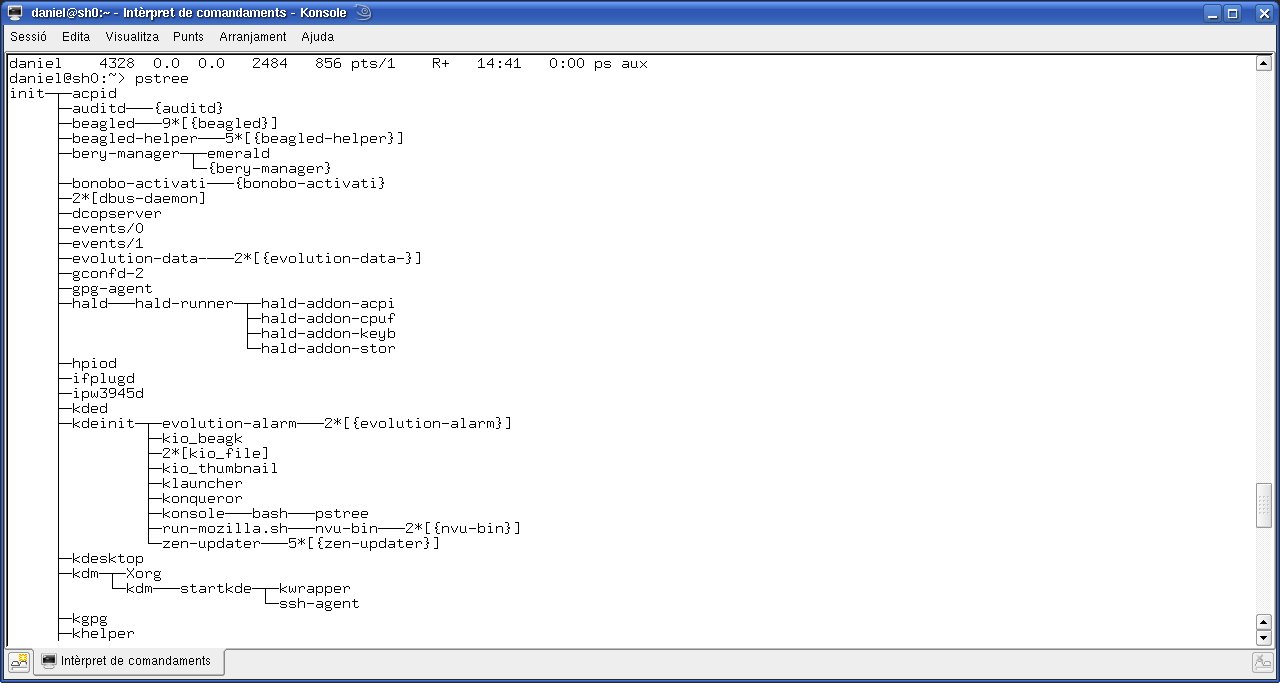
The command pstree -up displays the tree
of processes and information about the PID and UID of each
process.
2.3- top command
The
program provides a dynamic list in real-time of all running
processes. Information about the process ID, user ID, % of CPU time
and % of RAM allocated to the process, nice number, state of the
process, what time the command was started and command name (with
arguments) will be show on the screen. The next example
shows what happens when the top command is executed:
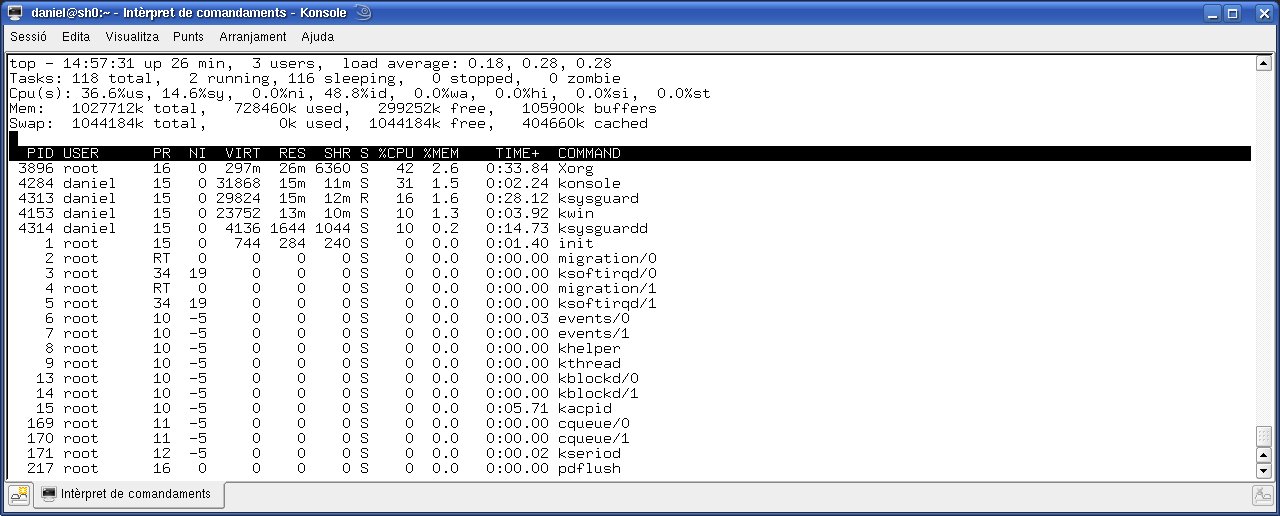
Press the p key if you want to end the
top
command and come back to the terminal.
2.4- Working with the GNOME System Monitor
The tab
"Processes" of GNOME System
Monitor (System --> Administration --> System
Monitor) displays information about the active processes in a
friendly GUI enviroment:
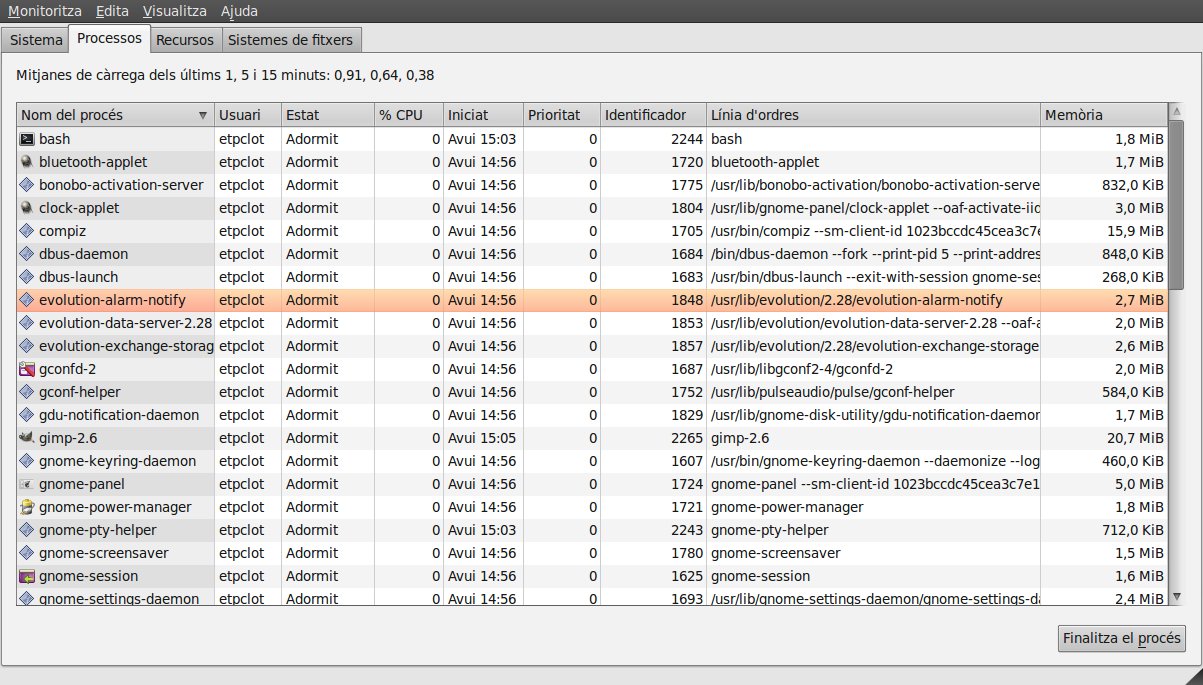
IMPORTANT NOTES:
a) Select the All
Processes
option of the View menu.
b) Select the following
options in Information Fields
of Edit --> Preferences
--> Processes: Process name, User, Status, %CPU,
Started, Nice, ID, Command Line and Memory.
3- Ending processes
3.1- kill command and signals
Processes
end because they receive a signal. There are multiple signals that
you can send to a process. If you want to send a signal to a
process, you will have to use the kill command. The command kill -l shows a list of signals. Some of the most important
signals, are the following:
| Signal name |
Signal number |
Meaning |
| SIGTERM |
15 |
Terminate the process in an
orderly way (By
default, if no signal is written, the kill command send
the SIGTERM signal to a process). |
| SIGINT |
2 |
Interrupt the process. A
process can ignore this signal. |
| SIGKILL |
9 |
Interrupt the process. A
process can not ignore this signal. |
| SIGHUP |
1 |
For daemons: reread the
configuration file. |
To kill a process you need
to know its PID. The ps command can provide you this
information.
The
synopsis of the kill command is : kill
<-SIGNAL> PID.
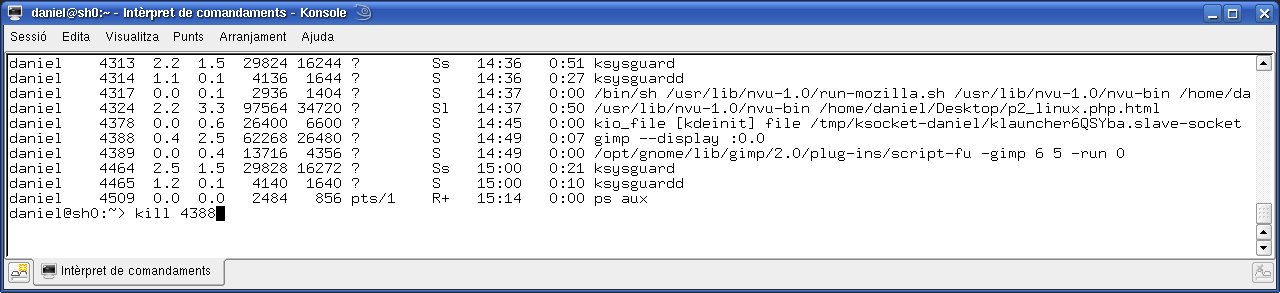
The next
example shows how we can run the kill command to end a process
using its PID:
Now, if we run the ps
command, the the next information will be displayed on the screen:

Some additional
examples:
a) kill -SIGTERM 4388
(equivalent to kill
-15 4388 or kill
4388)
b) kill
-SIGKILL 4388 (equivalent to kill -9 4388)
As SIGKILL is a
method of last resort and inherently dangerous (data used by the
process can be definitely lost), you should use this signal
cautiously. You should send the termination signal SIGTERM
when you need to end a process. Only if this signal does not work
should you attempt to use the -SIGKILL signal.
3.2- killall
It is an
alternative to command kill. The killall command kills all processes
associated with programs whose names are provided to it as
arguments. It is an alternative to command kill. The killall
command kills all processes associated with programs whose names
are provided to it as arguments. It is an alternative to command
kill. A signal may be provided as an argument as well. If no
signal is specified, SIGTERM is sent.
The basic
synopsis of the kill command is : killall
<-SIGNAL> program_name(s). Signals can be specified
either by name (e.g. -SIGKILL ) or by number (e.g. -9).
A killall process never kills
itself (but may kill other killall processes).
The next
example shows how we can run the killall command to end all
instances of the geany
text editor:
The killall command can end two
or more process associated with program if a list of program names
is provided to killall as
arguments. For instance:
killall geany firefox-bin nano
3.3-
Killing
processes with the GNOME System Monitor
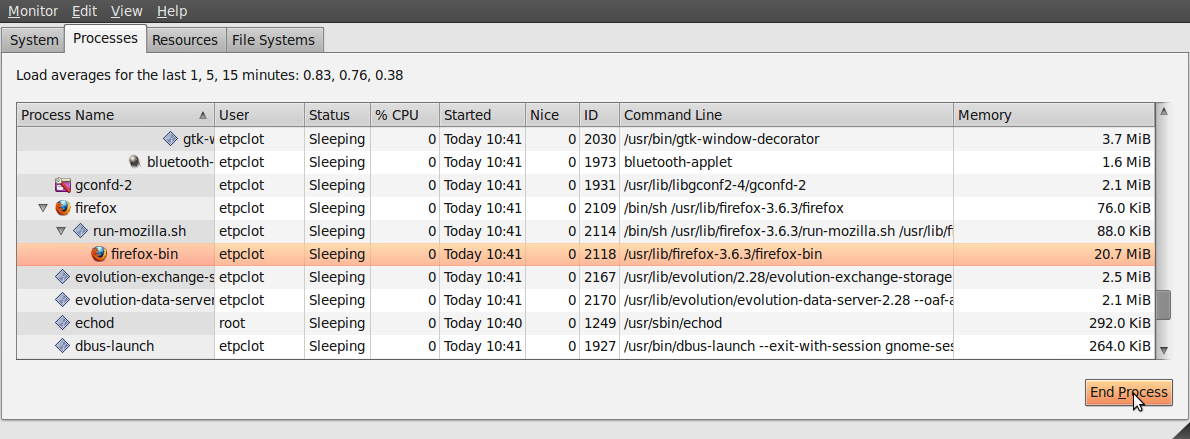
If you want to end a
process using the GNOME System
Monitor, you have to select the process (firefox-bin in the next
example) and then press the virtual key "End Process" at the
right bottom corner. Example:
4- Process priority: nice and
renice commands
Linux can run multiple
processes. It does this by sharing the CPU and other resources
among the processes. When you only have one or a limited number of
CPUs, you need to decide how to share those limited CPU resources
among several competing processes. This is generally done by
selecting one process for execution and letting it run for a short
period, or until it needs to wait
for some event, such as IO to complete. To ensure that important
processes get enough CPU time, a selection must be done based on a
scale of "priorities". By
using this scale we can allocate our CPU resources more
appropriately. High priority programs like daemons, services
or I/O processes can be set to receive more of the CPU’s focus,
while lower priority programs, which are not so important, can be
set to receive a lesser CPU’s focus.
In Linux,
processes have a priority number called "nice value" , which is a
number between -20 and 19. The value of -20 is the highest, and 19
is the lowest priority with a default of zero. Process
priority can be set with the nice command and changed using
the renice
command. Larger nice values correspond to a lower priority (you
are being nice to the other processes on the system). Processes
with a lower nice value (higher priority) run before processes
with a higher nice value (lower priority). The nice value also
determines the CPU time assigned to each process.
4.1-
Displaying the nice value
If you wnat to display the priority of processes running in you
system, you can run one of the following commnads:
a) ps -eo
pid,user,ni,%cpu,%mem,stat,start,time,args
b) ps -alx
4.2- Starting a process with a
different priority (not its default priority). Using the nice
command.
The nice command (with -n option) is used to start a
process with a different priority. Keep in mind the following
rules:
a) -n
b) -n
c) You usually have to be root to specify negative value.
Examples:
a) Starting, as a regular
user, the geany program with a lower
priority (or higher niceness):
nice -n 5 geany
&
Geany has been started
with a decrease in its default prioriy equal to 5.
b) Starting, as
root user, the geany program with a higher
priority (or lower niceness):
nice -n -4 geany
&
Geany has been started
with an increase in its default prioriy equal to 4.
4.3-
Changing priority of a running process. Using the renice
command.
The renice is used to change the
priority of a running command. Keep in mind the following rules:
a)
b) You have to be root to run the renice command and decrease a
nice value below its default value.
c) You will need the PID.
Examples:
a) Changing the priority of
process 6876 :
renice +10 6876
The nice value of
process 6876 has been changed to 10.
a) Changing the
priority of process 9854 :
renice -15 9854
The nice value of
process 9854 has been changed to -15.
4.5- Using the GNOME
System Monitor
You can use GNOME System
monitor to change the priority of the process. Launch System
Monitor from System > Administration > System
Monitor and go to the Processes tab
as shown in the following screenshot:
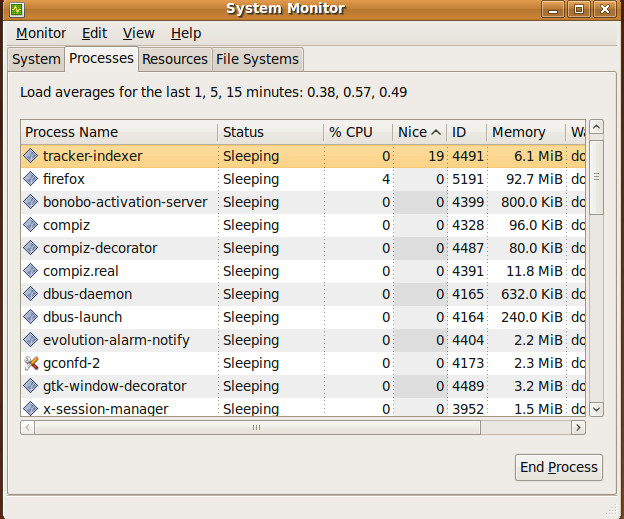
Now, you will be able to
see the Nice column in front of every process.
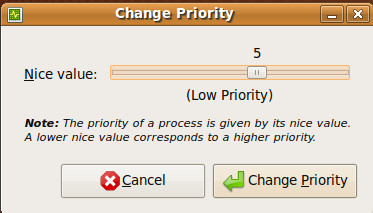
It basically specifies the priority value of the process. You can
change priority of any process by right clicking the Nice
column value and choosing Change Priority as
shown in the following screenshot.
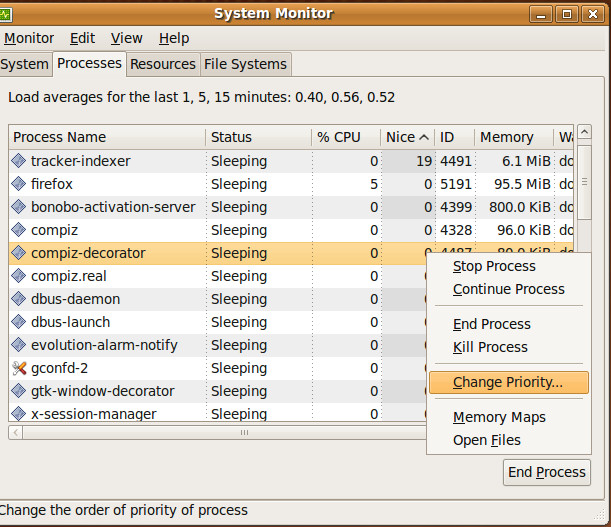
Thats all, adjust the
new priority value and click Change Priority.
PRACTICAL EXERCISE
1- Open the terminal. Find out its PID and name
using the ps command and the GNOME System
Monitor. Is there any difference between PID given by the
command and the GUI program?. Why?
2- Run a command to show
only the relevant information about the terminal process. What
is the problem with this command?. How would you avoid that
problem?
3- End the terminal
process using the GNOME System Monitor.
4- Open the terminal.
Find out its PID. Compare its current PID and the PID found in
the 1st question. Is there any difference between them? Why?.
5- End the terminal
process using the kill command.
6- Start the OpenOffice
Word Processor. Using the ps command, show
information about the process ID, effective user (number and
name), % of CPU time and % of RAM allocated to the process and
command name (with arguments). Write some text in the new
document. Do not save the text. End the process using the kill
command. Start the OpenOffice Word process and the System
recovery process. Have you recovered the text written? Why?.
7- Open the OpenOffice
Word Processor. Open a termional and change to user fje. As fje
user, find out the PID and user ID of the OpenOffice Word
Processor. Try to kill the process. Are you able to kill
it? Why?.
8- Become another time
your "by default" user. Change to root. As root user,
find out the PID and user ID of the OpenOffice Word
Processor. Try to kill the process. Are you able to kill
it? Why?.
9- As root user,
find out the PID and user ID of the cups server. End the
cups server using the command kill and the signal SIGHUP.
Is there any change in the PID process?. Why?.
10- End the cups server
using the command kill and the signak SIGTERM. Check if the
process has been ended.
11- Start three instances
of geany text editor
and two new instances of GNOME
system editor. End these 5 processes using their
names and one only command. Check the result of your command.
12- Start geany. Working with the terminal and as a
regular user (your user by default) check its nice value by
default. Check the
nice value of geany
using the GNOME System
Monitor. Is there any difference between the
nice value given by the command and the GUI program?. Why?.
13- As a regular user,
start a new instance of geany with an increase in its
default nice value equal to 7. Check if geany is running with the
new nice value. Have you had any problem? Why?.
14- As a regular user, start a new
instance of geany with a decrease in its default
nice value equal to 6.
Check if geany is
running with the new nice value. Have you had any
problem? Why?.
15- As root user , start a new
instance of geany with a decrease in its default
nice value equal to 6.
Check if geany is
running with the new nice value. Have you had any
problem? Why?.
16- As root user, close all
instances of the geany program.
17- As a regular
user, start a new instance of geany
with an increase in its default value equal to 3. Now, try to
change its nice value to -10. Are you able to change the nice
value of geany? Why?.
18- As a regular
user, start a new instance of geany
with an increase in its default value equal to 7. Now, try to
change its nice value to 2. Are you able to change the nice
value of geany? Why?.
19- As a root
user, change the nice value of the process geany started in the
previous question. Try to change its nice value to -13. Are
you able to change the nice value of geany? Why?.
20- As a regular
user, start a new instance of geany
with an increase in its default value equal to 7. Now, try to
change its nice value to 2 using the GNOME Monitor System. Are
you able to change the nice value of geany? Why?.
21- Now, try
to change its nice value to -4 using the GNOME Monitor System. Are
you able to change the nice value of geany? Why?.
22- Find out two
different ways of changing the nice value using the GNOME Monitor System.
NOTES
1- HowTo enable gnome root login on Debian
